
NVIZ Reference Manual
CONTENTS
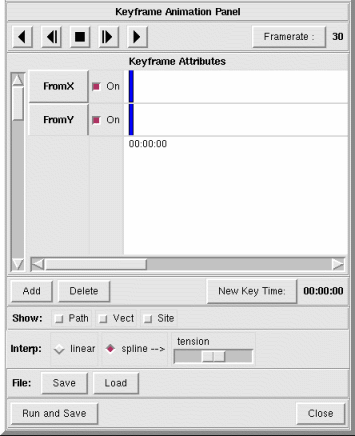
Keyframe Animation Panel
The Keyframe Animation panel lets you create complex
animations where you need precise camera control. Each keyframe that you
set has nine channels, and each channel represents a part
of the current view. For example, the Field of View (FOV) is a
separate channel in each keyframe.
The d.nviz GRASS module may be used to
automatically create Keyframe animation templates which can be loaded by
this panel.
-
OPTIONS
 (Reverse Play)
- Plays the animation backwards.
 (Reverse)
- Moves backward through the animation one frame at a time.
 (Stop)
- Stops the animation.
 (Forward)
- Moves forward through the animation one frame at a time.
 (Play)
- Plays the animation.
- Framerate
- Sets the framerate (frames per second) for the animation.
- Keyframe Attributes
- The Keyframe Attributes scrollbar on the left moves
through the nine channels of each keyframe. The bottom scrollbar moves
through the user defined keyframes in time.
A thick vertical blue line marks the current position (frame) in the
animation. The current key time appears below this line in black. A light blue
rectangle indicates selected channels for each keyframe. The key time of
each keyframe appears vertically below each keyframe in light blue text.
To change your current position (frame) in the animation, click or click and
drag the thick vertical blue line in the channels area.
To change the position (in time) of a keyframe, click and drag the
vertical light blue key time text. To select a keyframe (or multiple keyframes)
for deletion, middle-click the vertical light blue key time. The key times
of selected keyframes will turn black.

- Channels
- Each keyframe has nine channels that you can either turn on or off.
The default for all channels is on. You need to set your channel options
before adding a keyframe.
-
- FromX
- Records the X coordinate of the camera (if selected).
- FromY
- Records the Y coordinate of the camera (if selected).
- FromZ
- Records the Z coordinate of the camera (if selected).
- DirX
- Records the X coordinate of the center of view (if selected).
- DirY
- Records the Y coordinate of the center of view (if selected).
- DirZ
- Records the Z coordinate of the center of view (if selected).
- FOV
- Records the Field of View (if selected).
- TWIST
- Records the twist of the camera (if selected).
- cplane-0
- Records the current position of the cutting plane (if selected).
- Add
- Adds a key frame at the current New Key Time.
The keyframe will store the selected channel information of the currently
held view (camera angle, camera distance, height, twist, etc.). A keyframe's
view attributes can not be directly modified after creation. If you wish
to slightly alter the view at a key time, you will need to create a new
keyframe at a nearby key time, delete the old keyframe, then move the new
keyframe into the old keyframe's key time slot.
The New Key Time automatically increments by 3 seconds after
each keyframe is added.
- Delete
- Deletes all selected keyframes from the animation. You select keyframes
from the Keyframe Attributes window by middle-clicking on the
light blue vertical key time text. Selected key times will be shown in black.
Deleted keyframes are not recoverable.
- New Key Time
- Allows you to set a new key time. You enter key times as minutes,
seconds, and frame number. Each time you add a keyframe, the key time
automatically increments by 3 seconds.
To calculate the length of the animation (in frames), use this formula
(minutes*60 + seconds)*frame rate + frame number.
- Show Feature
- Use these options to enable annotations on the animation.
-
- Path
- Shows the path that the animation follows between key frames
(if selected). This is useful for adjusting the tension if using a
spline interpolation.
- Vect
- Draws all loaded vector maps in the animation (if selected).
- Sites
- Draws all loaded sites files in the animation (if selected).
- Volume
- Draws all loaded 3D volumes in the animation (if selected).
- Labels/Legend
- Draws all labels and legends in the animation (if selected).
- Interp.
- Sets the interpolation used between key frames.
-
- Linear
- Uses a linear interpolation between key frames.
- Spline
- Uses a spline interpolation between key frames at the selected
tension.
- Tension
- Sets the tension of the spline interpolation.
- Animation: Run and Save
- Runs the animation and saves each frame as an image. You must supply a
file name prefix, frame start number, image type, and draw type. The image file name includes the file prefix, frame number and image type. For example, frame number 12 with a file prefix of FLY saved as a PPM would be named FLY0012.ppm. You can choose to render the animation off-screen (in memory). To render off-screen, you need to minimize the NVIZ viewer.
- File:
-
- Save
- Saves the keyframes attributes to a user defined file.
- Load
- Loads a previously saved keyframe animation file.
- Close
- Closes the KeyFrame Animation panel.
EXAMPLE
Open the Surface panel
(Panel->Surface in
the menu) and set the "Fine" polygon resolution to 2.
(set to 1 if you don't get display artifacts)
Many encoder codecs require that the input frame size be divisible by 16.
Set this in File->Set Canvas Size. (e.g. 512x512)
Change back to the keyframe animation panel (Panel->Keyframe
animation in the menu).
Set first view, click [Add].
Set [New key time] to 0:02:00, change view, click [Add].
Set [New key time] to 0:04:00, change view, click [Add].
etc.
Rewind & press the play button to preview.
If you output to individual frame images (e.g. PPM) you will need to do the
encoding step on your own. See the relevant documentation that comes with
your encoder. For example:
  ###### Pick a codec ######
  ## DivX - libavcodec MPEG 4 (DivX5)
  OVC="-ovc lavc -lavcopts vcodec=mpeg4:vhq:vbitrate=1800"

  ## XviD
  OVC="-ovc xvid -xvidencopts bitrate=1024"

  ## DivX4
  OVC="-ovc divx4 -divx4opts q=5"

  ######

  ## Encode all .png files in directory to out.avi with 15 frames per second.
  mencoder "mf://*.png" -mf fps=15 -o out.avi $OVC
Alternatively, NVIZ can encode to a MPEG-1 movie automatically.
(simpler, but lower quality)
Assuming NVIZ was built with FFMPEG support for live MPEG rendering:
Next click "Animation: [Run and Save]",
type in a basename.mpg,
click the "<> MPEG-1 button",
click the "<> Full Rendering" button,
click [Ok].
whiz-bang-whirl.
Done.