|
|
Managing Packages
| |
You can create data packages to zip up large quantities of data for
easy transfer. For more information about the process of packaging
data, see About Packages.
|
|

Naming a package
|
To make a package
1
On the Manage Packages page, for Folder Name, specify the folder
that you want to package.
All folders below the specified
folder will be included in the package.
2
Click the Resulting Package Name field.
A default name for the .mgp file
appears.
3 Optional:
Change the name if you wish.
4 Click
Make.
The package is created and saved
in the folder specified on the Configure Services page.
|
| |
You can load packages created in the Site Administrator or in Autodesk
MapGuide Studio.
|
|
Loading a package
|
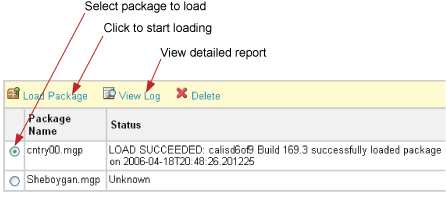
To load a package
1
On the Manage Packages page, in the left-hand column, select a package.
All packages
stored in the packages folder are displayed in the list.
2
Click Load Package.
The load process starts. You
will see a page showing that the process is executing. On completion,
the Status column displays a message like the one in the illustration.
3 Optional:
If the load failed, click View Log to see more detail about the
cause of the failure.
4 When
the load has successfully completed, click Delete to remove the
package file from the package folder.
|
|
